Policy authoring
The starting point of all Policy Designer tasks is the Policies created screen which displays after logging in. It offers a list of the policies you have already created, their status, and actions related to them.
The interface of Policy Designer adapts to different screen resolutions and currently supports screens that are at least 1361px wide.
The status of a policy can either be Enabled or Disabled. However, there is an additional status called Draft for policies whose creation process was not finalized.

On this page you can perform the following actions:
Use the search field to look up policies by name and narrow down the policies list.
infoThis is a dynamic search field and returns relevant results as you type.
Create a new policy from scratch.
Edit or duplicate an existing policy directly from the list.
Delete a policy that is no longer required.
Enable a policy.
Create a policy
Start creating a new policy by clicking New policy on the upper right side of the Policies created screen.
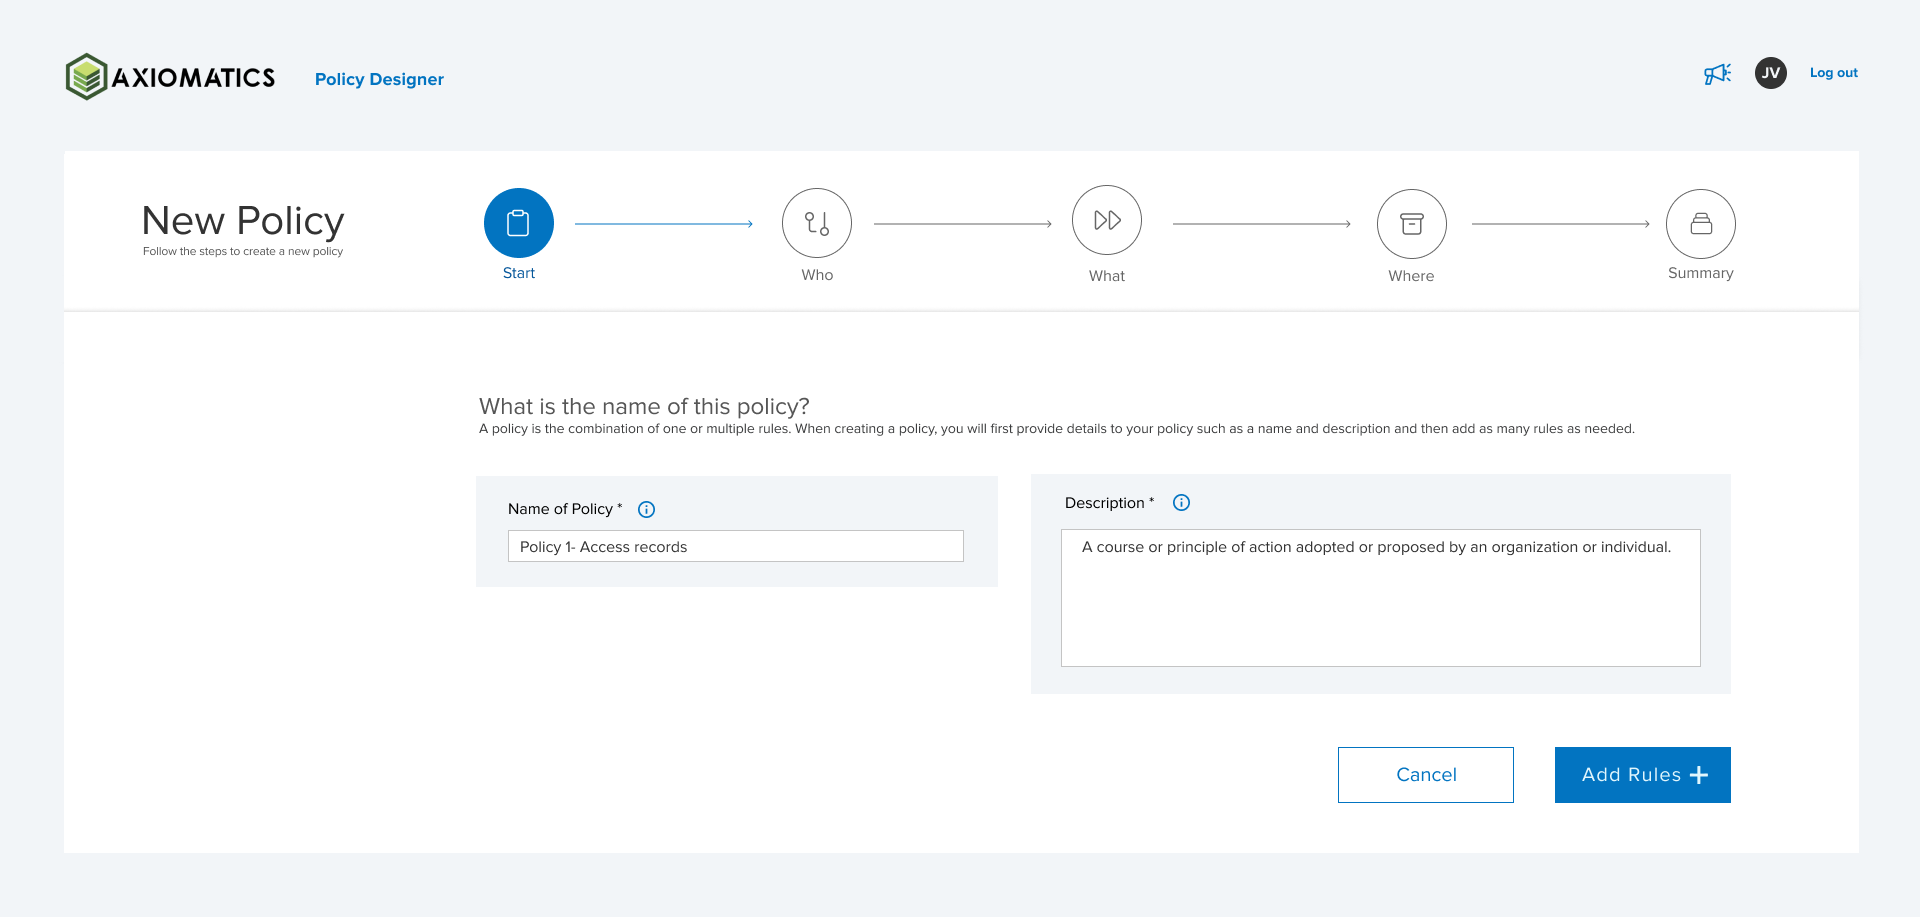
Start
This is the first step of the policy creation procedure. In this step, you enter a policy name and a description.
Start by adding a Name for your new policy.
notePolicy names should meet the following requirements:
- unique across projects
- up to 128 characters long
- make use of the following character-sets only:
- letters: English alphabet [a-z] and [A-Z]
- numbers: [0-9]
- whitespace: regular space (spacebar) [⎵]
- punctuation marks: hyphen [-] and underscore [_] :::
Add a Description to provide context or specific details.
noteThe description should be up to 512 characters long.
Click Add Rules + to proceed.
Rules are children of policies and control whether access is given. They specify Who gets access, What actions are allowed, and Where they should be applied.
When a request is received, the system checks it against all rules of your policy for a match. If any rule matches the request attributes, then it is authorized.
If you cancel the creation process, you have the option to save it as draft. Draft policies retain only their names and descriptions.
Who
Define who this rule should grant access to. In a rule, "who" is the subject. A subject can be an identity, a role, or a location.
Enter a name for your rule in the Give your rule a name field.
noteRule names should be unique within a policy.
Select an Attribute and a Condition from the drop-down menus, and enter a Subject name.
Optionally, create an exception to the rule you are working on:
Select the corresponding checkbox.
Select an Attribute and a Condition from the drop-down menus, and enter a Subject name.
noteYou can create only one exception per subject.
If needed, add more subjects by clicking Add subject +. Follow the same procedure as in steps 2 and 3 above.
noteYou can create up to two subjects per policy.
Remove a rule by clicking the - sign next to it.
Proceed to the What step by clicking Next >.
What
Specify what actions should this rule allow. Actions define the operations allowed on a specific resource. Examples include read, write, delete, etc.
Select an Attribute and a Condition from the drop-down menus.
Enter the Action name.
If needed, add more actions by clicking Add action +. Follow the same procedure as in steps 1 and 2 above.
noteYou can create up to five actions per policy.
Remove an action by clicking the - sign next to it.
Proceed to the Where step by clicking Next >.
Where
Specify where this rule should be applied by identifying the resource(s), meaning the information asset(s), being accessed. A resource can be a file server, a folder, a single file, an application, an application component, etc.
Select an Attribute and a Condition from the drop-down menus.
Enter the Resource name.
If needed, add more resources by clicking Add resource +. Follow the same procedure as in steps 1 and 2 above.
noteYou can create up to five resources per policy.
Remove a resource by clicking the - sign next to it.
Proceed to the Summary by clicking Next >.
Summary
Add more rules or perform any required edits to your policy. Finally, save it.
Add more rules
Click Add rule +.
The Who step displays.
Perform your changes following the steps above, starting with the Who section.
Edit the policy name and/or description
Click the edit button next to the policy name and/or description you want to edit.
Update the field as needed.
noteMake sure that the updated value meets the requirements listed here.
Click outside of the field you just edited.
If your input is valid, changes are automatically applied. If not, an error message displays, and you should fix any issues in order to proceed.
Edit the rule(s)
Click the edit button next to the rule name you want to edit.
The Who step displays.
Perform your changes following the steps above, starting with the Who section.
Delete rule(s)
You can delete a rule only if more than one exists for the policy.
This action cannot be undone and deleted rules cannot be recovered.
Delete all unneeded rules by clicking the delete button.
Click Yes, delete rule.
The rule is removed from the policy and only the remaining rules display.
Save your policy
Review your policy details.
Click Save policy.
The Policies created screen displays. Your new policy is saved and listed in the table.
noteNewly created policies are not enabled automatically.
Manage your policies
Policy Designer allows you to manage your policies by offering the following options:
- edit the details, rules, attributes, etc. of existing policies
- duplicate a policy and use the copy as a starting point for a new one
- delete any unneeded, invalid, or outdated policies
- enable and activate policies
Edit a policy
Editing an enabled policy automatically disables it.
Go through the list of policies or use the search field to find a specific policy.
Click the edit button on the row that contains the policy you want to edit.
The Summary screen for the specified policy displays.
Perform any changes required as described in the Summary section above.
Duplicate a policy
A duplicate policy can serve as a starting point for a new policy or to perform changes without losing the initial functionality.
Go through the list of policies or use the search field to find a specific policy.
Click the duplicate button on the row that contains the policy you want to duplicate.
The Summary page of the duplicate policy displays.
Perform any required changes.
noteThe auto-assigned name for the duplicate policy is "Copy of" plus the original name.
Click Save policy.
Delete a policy
Delete policies that are no longer valid or in use. You can only delete policies whose status is Disabled or still in draft state.
This action cannot be undone and deleted policies cannot be recovered.
Go through the list of policies or use the search field to find a specific policy.
Hover the mouse pointer over the policy you want to delete.
Click the delete button on the far right of the row.
A confirmation modal displays.
Click Yes, delete policy to permanently delete the specified policy, or Cancel to keep it.
Enable a policy
Only one policy can be enabled at a time. After activating a policy, the previously enabled policy, if any, will get disabled.
Go through the list of policies or use the search field to find a specific policy.
Toggle the Status switch to Enabled on the row that contains the policy you want to enable.
A confirmation modal displays.
Click Yes, enable this policy, or Cancel to keep using the currently enabled policy.
After enabling a policy, a domain file is created under the project that was assigned to you. This domain encapsulates the policy that you created and just enabled.
Notify your administrator and await their action.