Keycloak
Axiomatics Services Manager (ASM) uses Keycloak for authentication and access management services in its implementation.
The configuration needed for the interaction between ASM and Keycloak is below.
Disclaimer
There are many features and options available in Keycloak. However, only settings and configurations explicitly mentioned in the Axiomatics Services Manager documentation are supported. Axiomatics assumes no responsibility or liability for the use of other configuration options.
For more information about Keycloak configuration options, please refer to the Keycloak documentation.
Manage users in Keycloak
During the installation of ASM, a Keycloak service is also installed, to serve as an authentication module.
Only a default administrative user is created automatically during the installation. All other users must be created and assigned a role in Keycloak, before they can log in to ASM.
Log in to Keycloak for the first time
-
Open a web browser window and go to:
- Default hostname
- Custom hostname
*:first-child]:mt-0>https://localhost/authif you are using the default hostname.*:first-child]:mt-0 hidden>Append
/authto the hostname you are using. For example,https://example.com/auth. -
The Keycloak login page displays. Use the default credentials to log in:
-
Default username:
admin -
Default password:
admin
noteAxiomatics strongly recommends changing the password immediately. See Keycloak: User Credentials for details..
-
Create a user in Keycloak
All users, except the default administrative user, must be created and assigned a role in Keycloak before they can log in to ASM.
-
Open a web browser window and go to
https://localhost/auth. -
Log in to the Keycloak administration console and go to the Asm realm.
-
In the menu, under the Manage section, click Users.
-
Click Add User in the upper right corner.
The Add user page displays.
-
Enter a name in the Username field, which is required. The rest of the fields are optional.
noteThe characters ':', '[', ']', '|', and '*' are not allowed in the username.
-
Click Save.
-
Switch to the Credentials tab.
-
Enter a new password in the Password and Password Confirmation fields.
-
Toggle the Temporary switch OFF.
-
Click Set Password.
Repeat for as many users you want to add to the system.
Map user roles
- In the menu, under the Manage section, click Users.
- Use the search field to find the user you wish to assign roles to.
- Switch to the Role Mappings tab.

- From the Available Roles list, select the roles you wish to assign to the user:
- asm-admins
- asm-users
- domain-auditor
- Click Add selected>.
The specified roles are assigned to the selected user.
This example shows a user that has been assigned all three roles, which is recommended for the administrator to be able to work with projects and the administration view. Respectively, for an ASM user, it is recommended to have assigned the asm-users and domain-auditor roles.
Delete a user in Keycloak
- Log in to the Keycloak administration console and go to the Asm realm.
- In the menu, under the Manage section, click Users.
- Select the user that you want to delete on the table.
- Click the Trashcan icon to delete the user.
- Go to ASM and remove all of the user's project assignments and delete them from the list of users.
Configure Keycloak for Policy Designer
Similar to ASM, Policy Designer uses Keycloak for authentication and access management services. In order for this interaction to take place, you first need to configure Keycloak accordingly.
Integrate an Identity Provider (IdP)
-
Open a web browser window and go to
https://localhost/auth. -
Log in to the Keycloak administration console and go to the Asm realm.
-
In the menu, under the Configure section, click Identity Providers.
-
From the Add provider dropdown, select the same IdP as the one set during installation.
The configuration page for the IdP you selected displays.
-
Copy the Redirect URI generated by Keycloak and use it as the redirect (callback) URL required by the IdP, as described in the Keycloak documentation.
-
Enter the Client ID and Client Secret provided by the IdP.
noteFor Bitbucket, the fields are named Consumer Key and Consumer Secret respectively.
-
Click Save.
The Identity Provider is now configured.
Verify the Policy Designer client configuration
The Policy Designer client comes pre-configured, but occasionally the configuration might be incorrect. Follow the steps below to verify the domain used in the Policy Designer client configuration.
-
In the menu, under the Configure section, click Clients.
-
Find and click the pd Client ID on the table.
-
Check the values of the following fields and update the domain with your own, if necessary:
-
Root URL
For example,
https://<your_domain>/pd -
Valid Redirect URIs
For example,
https://<your_domain>/pd/* -
Admin URL
For example,
https://<your_domain>/pd -
Web Origins
For example,
https://<your_domain>
-
-
If any updates were made, click Save.
The Policy Designer client is now configured.
Configure Keycloak for ADS
To enforce authorization and project permissions, a mapper must be configured in Keycloak to map project permissions to claims when ADS is accessing a domain in the domain manager of ASM.
Most of these settings are created automatically during installation. However, a few configuration steps are necessary.
The following information assumes the system administrator has access to the Keycloak administration console. See Log in to Keycloak for the first time for first-time login instructions.
Regenerate a client secret
- Open a web browser window and go to
https://localhost/auth. - Log in to the Keycloak administration console and go to the Asm realm.
- In the menu, under the Configure section, click Clients.
- Find and click the ads Client ID on the table.
- Switch to the Credentials tab.
- Click the Regenerate Secret button to create a value for the Secret field.
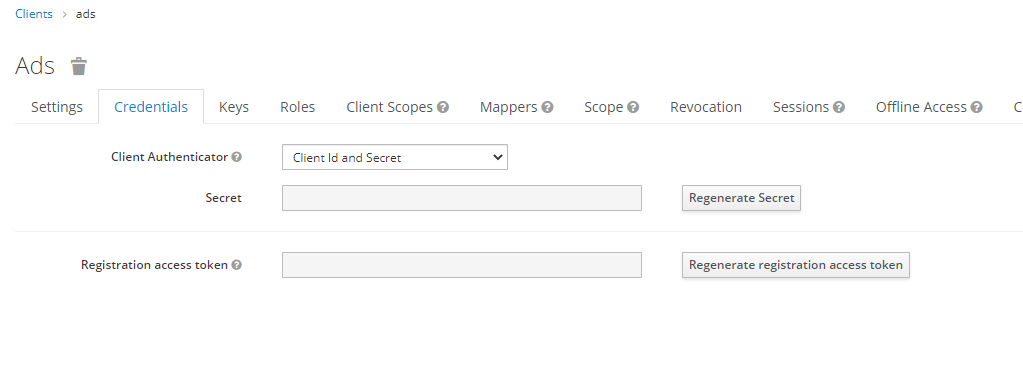
Copy the value of the Secret field to use it in the configuration of ADS. See Authentication using an authorization server for more information.
Update the mapper for the namespaces claim
- In the menu, under the Configure section, click Clients.
- Find and click the ads Client ID on the table.
- Switch to the Mappers tab.
- Go to the Namespaces mapper.

- In the field Claim value, list the namespaces, which in ASM are equivalent to projects, that the client should have access to (a JSON Array of strings: [ "ns1", "ns2" , "ns3" ]).
- Click Save to save the mapper.
This concludes the configuration of the Keycloak client for ADS.
What's next?
Assign users to projects and adjust their permissions as described in the Users and projects topic.