Installation using Kubernetes
This section describes how to deploy ASM using Kubernetes (K8s).
The instructions below refer to a fresh installation of ASM.
You can install K8s in one of the following ways:
🖥️ Local installation using minikube.
☁️ Cloud installation using EKS by Amazon Web Services (AWS).
Requirements
- Local installation
- Cloud installation
To run ASM locally on a K8s minikube environment, install:
-
Kubernetes and kubectl
The open-source system for automating deployment, scaling, and management of containerized applications along with its command line tool.
-
Local K8s for macOS, Linux, and Windows.
-
The official command line interface to manage AWS services.
-
The package manager for K8s.
-
Docker and Docker Compose
The open platform to package and run applications in isolated containers along with the tool for defining and running multi-container Docker applications.
To run ASM on a K8s cloud AWS environment using Amazon EKS, install:
-
The official command line tool for communicating with a K8s cluster.
-
The package manager for K8s.
-
The official command line interface to manage AWS services.
-
Docker and Docker Compose
The open platform to package and run applications in isolated containers along with the tool for defining and running multi-container Docker applications.
-
A CLI tool for creating and managing clusters on Amazon EKS.
Preparation
Axiomatics Services Manager is downloaded via AWS CLI. If you have not already done so, install AWS CLI following the instructions in AWS documentation.
-
Configure the Axiomatics AWS CLI account using the
aws configurecommand, as explained in the AWS documentation. This procedure requires an Access key ID and a Secret access key, which will have been provided to you by Axiomatics.tipOptionally, you can create and use profiles to store these settings, as described here. This could come in handy in deployments using a remote registry which requires an additional AWS CLI account from your side.
-
The ASM distribution is downloaded as a ZIP file, containing a pre-configured Docker-based installation. Run the following command in the terminal to download ASM:
aws s3api get-object --bucket axiomatics-customer-artifacts --key releases/com/axiomatics/axiomatics-services-manager/axiomatics-services-manager/7.2.0-0/axiomatics-services-manager-7.2.0-0.zip axiomatics-services-manager-7.2.0-0.zipwarningReplace the version placeholders with the most recent available distribution.
Docker registry
The Docker registry is a server side application that stores and lets you distribute Docker images. Axiomatics recommends working with a remote registry both for local and cloud installations. However, for local installations only, if a remote registry cannot be supported by your specific setup, then you can deploy a local registry server.
Follow the steps below according to your specific setup:
- Remote registry
- Local registry
In the snippet below replace
<region_code>with the AWS Region that you want to create your cluster in<aws_account_id>with your AWS account ID
-
Configure your AWS CLI account using the
aws configurecommand, as explained in the AWS documentation. -
Log in to your Amazon ECR registry.
aws ecr get-login-password --region <region_code> | docker login --username AWS --password-stdin <aws_account_id>.dkr.ecr.<region_code>.amazonaws.com -
Create the following repositories in your ECR registry, as described in the AWS documentation:
axiomatics/admaxiomatics/api-gatewayaxiomatics/asm-coreaxiomatics/postgresaxiomatics/influxdbaxiomatics/pd-apiaxiomatics/pd-uiaxiomatics/keycloak-mappersaxiomatics/service-aggregator
In the snippets below replace <hostname> with your own hostname. In case you do not have a hostname and you are working with localhost, add the special domain host.docker.internal.
-
Create a directory.
mkdir certs -
Create a self-signed certificate.
openssl req -x509 -newkey rsa:4096 -sha256 -days 3650 -nodes -keyout certs/registry.key -out certs/registry.crt -subj "/CN=<hostname>" -addext "subjectAltName=DNS:<hostname>" -
Add the certificate to Docker trusted certificates. Based on your OS:
-
Windows:
Install the
registry.crtcertificate on your Local machine in the Trusted Root Certification Authorities. -
macOS and Linux:
-
Create the certificates directory, if it doesn't exist already.
sudo mkdir -p /etc/docker/certs.d/<hostname>:5000 -
Copy the generated certificate to the Docker certificates directory.
sudo cp certs/registry.crt /etc/docker/certs.d/<hostname>:5000/ca.crt
-
-
-
Restart Docker and minikube.
-
Start the local registry.
docker run -d -p 5000:5000 --restart=always --name registry -v "$(pwd)"/certs:/certs -e REGISTRY_HTTP_TLS_CERTIFICATE=/certs/registry.crt -e REGISTRY_HTTP_TLS_KEY=/certs/registry.key registry:2 -
Create a PEM file and copy it to the Minikube configurations directory.
openssl x509 -in certs/registry.crt -out certs/registry.pem -outform PEMcp certs/registry.pem ~/.minikube/certs
Build the Docker images
-
Extract the ASM distribution ZIP file to the folder from where you want to run ASM.
-
Navigate to the
dockerfolder of the extracted distribution.-
Open the
credentials.txtfile and update the placeholder values for Access key ID and Secret access key with the values provided by Axiomatics.noteThese are the same values that were used in setting up AWS CLI.
-
Open the
.envfile and add your registry.- Remote registry
- Local registry
*:first-child]:mt-0>REGISTRY=<aws_account_id>.dkr.ecr.<region_code>.amazonaws.com/axiomatics/*:first-child]:mt-0 hidden>REGISTRY=localhost:5000/ -
Optionally, for deployments that include Access Decision Service (ADS):
Add your hostname
Open the
.envfile and update the values ofHOSTandCERTIFICATE_CNwith your own hostname.noteIn case you are working with
localhost, use the special domainhost.docker.internal.
-
-
Enable the BuildKit feature of Docker:
- Windows
- Linux/macOS
*:first-child]:mt-0>$Env:DOCKER_BUILDKIT=1*:first-child]:mt-0 hidden>export DOCKER_BUILDKIT=1 -
If you will be using Policy Designer, open the
docker/docker-compose.ymlfile and set the following:Add the alias of the IdP to be used by Policy Designer
This is required only if you will be using Policy Designer.
Parameter Value PD_IDP_NAMEThe alias of the IdP that will be set up later in Keycloak to work with Policy Designer. Learn more about the Configure Keycloak for Policy Designer.
The default is"google". Other available options:
User-defined
- OpenID Connect v1.0: Make sure that you use the same alias both here and in Keycloak!
- Keycloak OpenID Connect: Make sure that you use the same alias both here and in Keycloak!
Social
- GitHub:"github"
- Facebook:"facebook"
- LinkedIn:"linkedin"
- Instagram:"instagram"
- Microsoft:"microsoft"
- BitBucket:"bitbucket"
- Twitter:"twitter"
- Openshift v4: Make sure that you use the same alias both here and in Keycloak!
- Openshift v3: Make sure that you use the same alias both here and in Keycloak!
- GitLab:"gitlab"
- StackOverfIow:"stackoverflow"
Note: SAML is not supported.
Important: The value should be in **lowercase **and enclosed in double quotation marks.
Important: The IdP cannot be changed after the installation process is complete.Apply your branding to Policy Designer (optional)
Optionally, if you want to apply your own branding to the Policy Designer interface, you should also set the following:
Parameter Value PD_LOGOThe path to the logo image file displayed in the upper left corner of the Policy Designer interface.
The default is"./assets/logo.svg"and the file contains the Axiomatics logo.
Important: If changed, the value should be an absolute URL pointing to a JPG/JPEG, PNG, or SVG file. For example,"https://www.example.com/assets/your_logo.svg"
It is recommended that the image resolution is 210x50 pixels.PD_APP_NAMEThe app name/title displayed next to the logo and on the browser window.
The default is"Policy designer".
Important: The limit is 100 characters.PD_MAIN_COLORThe main color used in the Policy Designer interface, for buttons and highlighted components.
The default is"#0274C1".
Important: Replacement colors should be in hexadecimal notation.PD_BACKGROUND_COLORThe background color used in the Policy Designer interface.
The default is"#F2F5F8".
Important: Replacement colors should be in hexadecimal notation.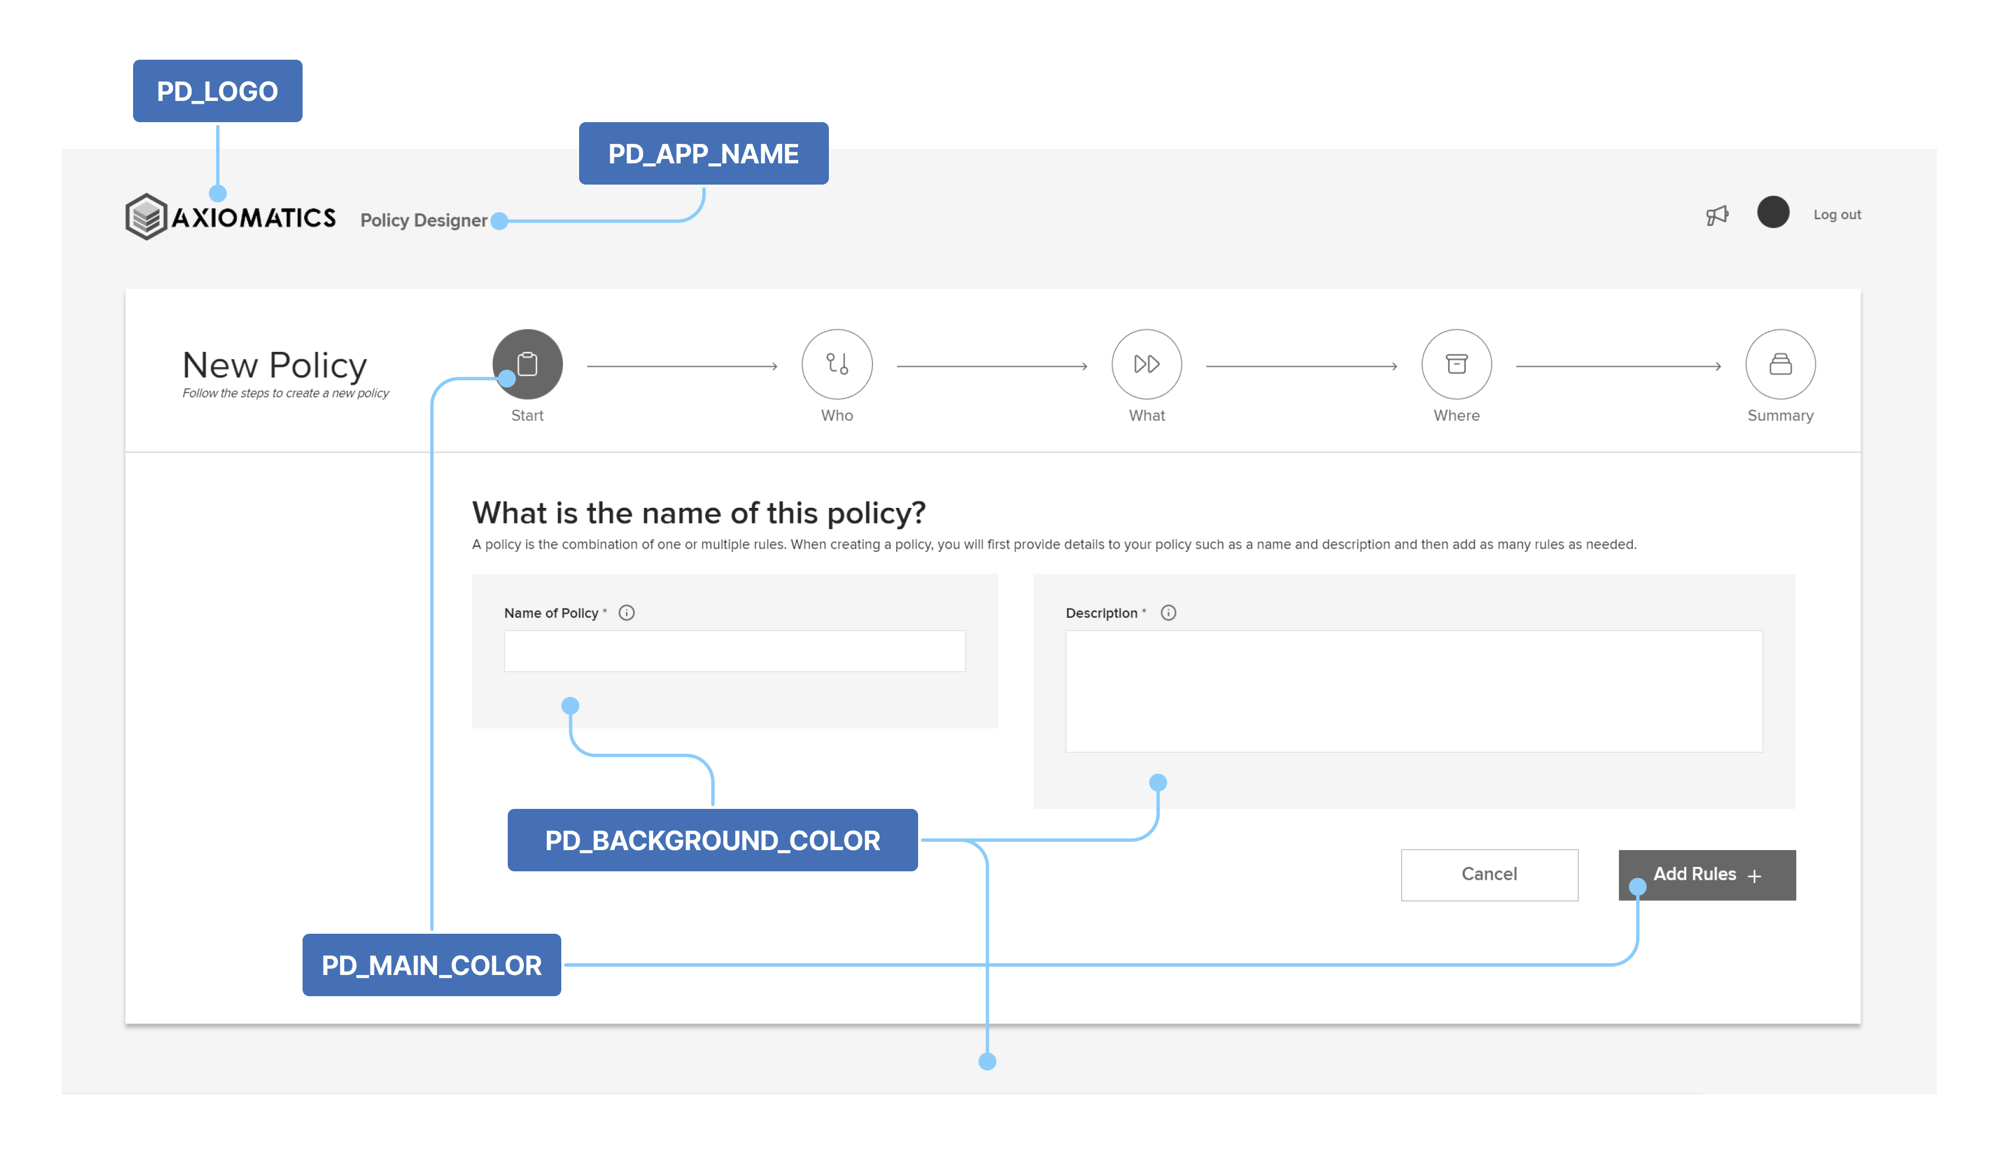
-
Run the following command to build ASM.
docker-compose -f docker-compose.yml -f docker-compose.dashboard.yml build
Push the image to your registry
Run the following command to push the image to your registry.
docker-compose -f docker-compose.yml -f docker-compose.dashboard.yml push
ASM K8s installation
- Local installation
- Cloud installation
-
Navigate to the
kubernetesdirectory.Add the
axiomatics_ASM.licenselicense file and launch a terminal window in this directory. -
Run the following command to start minikube.
minikube start#In case the system is slow, use the following command instead:minikube start --memory 4096 -
After minikube has started, launch a new terminal window and create a tunnel.
minikube tunnelwarningThis terminal window should remain open during the K8s installation.
-
On the initial terminal window, create the ASM namespace.
kubectl create namespace axiomatics-asm
Create secrets
-
Create a Kubernetes database secret.
warningReplace the placeholders for the database user, password, and host URL with your own.
kubectl create secret generic db-connection \--from-literal=dbuser=<db_user> \--from-literal=dbpassword=<db_password> \--from-literal=dbhost=<db_endpoint> \--from-literal=dbport=5432 \--from-literal=adm_dbname=domain_manager \--from-literal=keycloak_dbname=keycloak \--from-literal=asm_dburl=postgresql://db:5432/asm \--namespace=axiomatics-asm -
Create an ADM credentials secret.
kubectl create secret generic adm-credentials \--from-literal=admApiAuthUsername=admin \--from-literal=admApiAuthPassword=secret -n axiomatics-asm -
Create a Keycloak credentials secret.
kubectl create secret generic keycloak-credentials \--from-literal=keycloakUser=admin \--from-literal=keycloakPassword=admin -n axiomatics-asm -
Create a secret for pulling from ECR.
warningThis applies only to installations using a remote Docker registry.
kubectl create secret docker-registry regcred \--docker-server=<aws_account_id>.dkr.ecr.<region_code>.amazonaws.com \--docker-username=AWS --docker-password=$(aws ecr get-login-password) \--namespace=axiomatics-asm -
Create an ASM License secret.
kubectl create secret generic asm-license \--from-file=axiomatics_ASM.license \--namespace axiomatics-asm
Final steps
You can deploy ASM with the Dashboard functionality enabled or disabled.
-
Follow the steps below according to your specific setup:
- Disabled
- Enabled
*:first-child]:mt-0>Navigate to the
kubernetesdirectory and install ASM using Helm.warningReplace the placeholders with your own values. For details, see the table below.
helm install -n axiomatics-asm asm -f asmcharts/values.yaml asmcharts --set imageRegistry=<your_image_registry> --set asmHostname=<your_asm_hostname>tipStore this command in a TXT file for future reference, such as when upgrading to a later version of ASM or in case you want to enable cluster-level logging.
*:first-child]:mt-0 hidden>The Dashboard provides visualization of key metrics for monitoring the authorization performance of the running instances of Access Decision Service (ADS).
Navigate to the
kubernetesdirectory and install ASM using Helm.warningReplace the placeholders with your own values. For details, see the table below.
helm install -n axiomatics-asm asm -f asmcharts/values.yaml asmcharts --set imageRegistry=<your_image_registry> --set asmHostname=<your_asm_hostname> --set enableMetricsDashboard=truetipStore this command in a TXT file for future reference, such as when upgrading to a later version of ASM or in case you want to enable cluster-level logging.
Placeholder Value <your_image_registry>The image registry:
For local registry:host.docker.internal:5000
For remote registry:<aws_account_id>.dkr.ecr.<region_code>.amazonaws.com/axiomatics/<your_asm_hostname>The hostname assigned to the instance running ASM. The default is localhost. -
List all pods and make sure they are all running.
kubectl get all -n axiomatics-asm
In the snippets below replace
<region_code>with the AWS Region that you want to create your cluster in<my_cluster>with the name of your cluster<aws_account_id>with your AWS account ID<db_endpoint>with your own DB instance endpoint value such asmydb.123456789012.region-code.rds.amazonaws.com
-
Navigate to the
kubernetesdirectory and add theaxiomatics_ASM.licenselicense file. -
Launch a terminal window in this directory.
Create an Amazon EKS cluster
-
Create a cluster.
eksctl create cluster --name <my_cluster> --region <region_code> -
Enable
kubectlto communicate with your cluster.aws eks update-kubeconfig --region <region_code> --name <my_cluster>
Create a load balancer using Helm
-
Creating an IAM OIDC provider for your cluster.
eksctl utils associate-iam-oidc-provider --region <region-code> --cluster <my_cluster> --approve -
Create an IAM policy.
-
Download an IAM policy for the AWS Load Balancer Controller that allows it to make calls to AWS APIs on your behalf.
curl -o iam_policy.json https://raw.githubusercontent.com/kubernetes-sigs/aws-load-balancer-controller/main/docs/install/iam_policy.json -
Create an IAM policy using the policy downloaded in the previous step.
aws iam create-policy --policy-name AWSLoadBalancerControllerIAMPolicy --policy-document file://iam_policy.json
-
-
Create an IAM role and a Kubernetes service account.
eksctl create iamserviceaccount \--cluster=<my_cluster> \--namespace=kube-system \--name=aws-load-balancer-controller \--role-name "AmazonEKSLoadBalancerControllerRole" \--attach-policy-arn=arn:aws:iam::<aws_account_id>:policy/AWSLoadBalancerControllerIAMPolicy \--approve -
Install the AWS Load Balancer Controller using Helm.
-
Add the
eks-chartsrepository.helm repo add eks https://aws.github.io/eks-charts -
Update your local repo to make sure that you have the most recent charts.
helm repo update -
Install the AWS Load Balancer Controller.
warningReplace
<vpc_id>with your own VPC ID which can be found on the EKS cluster's Networking tab.helm install aws-load-balancer-controller eks/aws-load-balancer-controller \-n kube-system \--set clusterName=<my_cluster> \--set serviceAccount.create=false \--set serviceAccount.name=aws-load-balancer-controller \--set region=<region_code> \--set vpcId=<vpc_id> \
-
Create and configure the Axiomatics namespace
-
Create the namespace.
kubectl create ns axiomatics-asm -
Upload an SSL certificate to the AWS Certificate Manager (ACM).
noteIn case you don't have a self-signed certificate, you can create one locally with the following command, and then upload it to AWS Certificate Manager (ACM).
openssl req -x509 -newkey rsa:4096 -sha256 -days 3650 -nodes -keyout certs/registry.key -out certs/registry.crt -subj "/CN=<hostname>" -addext "subjectAltName=DNS:<hostname>"
Create the databases
-
Create a PostgreSQL database v. 12.9 using Amazon RDS, in the same VPC as the EKS cluster.
-
Configure the security groups. Enable ingress on the RDS security group on port 5432 from VPC CIDR.
-
Create a temporary POD to log in to the database.
kubectl run -n axiomatics-asm pgshell --pod-running-timeout=5m0s --rm -i --tty --image postgres -- /bin/bash -
Log in to the RDS.
psql -h <db_endpoint> -U postgres template1 -
Create the databases.
create database asm;create database keycloak;create database domain_manager;create database pd;grant all privileges on database asm to postgres;grant all privileges on database domain_manager to postgres;grant all privileges on database keycloak to postgres;grant all privileges on database pd to postgres; -
Exit.
\qexit
Create secrets
-
Create a Kubernetes database secret.
warningUse your own database user, password, and host URL.
kubectl create secret generic db-connection \--from-literal=dbuser=postgres \--from-literal=dbpassword=postgres \--from-literal=dbhost=<db_endpoint> \--from-literal=dbport=5432 \--from-literal=adm_dbname=domain_manager \--from-literal=keycloak_dbname=keycloak \--from-literal=asm_dburl=postgresql://<db_endpoint>:5432/asm \--namespace=axiomatics-asm -
Create an ADM credentials secret.
kubectl create secret generic adm-credentials \--from-literal=admApiAuthUsername=admin \--from-literal=admApiAuthPassword=secret -n axiomatics-asm -
Create a Keycloak credentials secret.
kubectl create secret generic keycloak-credentials \--from-literal=keycloakUser=admin \--from-literal=keycloakPassword=admin -n axiomatics-asm -
Create a secret for pulling from ECR.
kubectl create secret docker-registry regcred \--docker-server=<aws_account_id>.dkr.ecr.<region_code>.amazonaws.com \--docker-username=AWS --docker-password=$(aws ecr get-login-password) \--namespace=axiomatics-asm -
Create an ASM License secret.
kubectl create secret generic asm-license \--from-file=axiomatics_ASM.license -n axiomatics-asm
Final steps
You can deploy ASM with the Dashboard functionality enabled or disabled.
-
Follow the steps below according to your specific setup:
- Disabled
- Enabled
*:first-child]:mt-0>Navigate to the
kubernetesdirectory and install ASM using Helm.warningReplace the placeholders with your own values. For details, see the table below.
helm install -n axiomatics-asm asm -f asmcharts/values.yaml asmcharts --set imageRegistry=<your_image_registry> --set asmHostname=<your_asm_hostname> --set useExternalDatabase=true --set gateway.service.type=ClusterIP --set isAwsInstallation=true --set certificateARN=<certificate_ARN>tipStore this command in a TXT file for future reference, such as when upgrading to a later version of ASM or in case you want to enable cluster-level logging.
*:first-child]:mt-0 hidden>The Dashboard provides visualization of key metrics for monitoring the authorization performance of the running instances of Access Decision Service (ADS).
-
Create an IAM policy and role using
eksctl. -
Install the Amazon EFS driver using Helm.
-
Create two Elastic File Systems (EFS) in the VPC that EKS is running named:
influx-datainflux-config
-
Find the security group of the EKS cluster.
Select EKS cluster > Networking > Cluster security group
-
Use the same security group for the two EFS file systems you created previously.
Select EFS > select the File System > Network > Manage
-
Navigate to the
kubernetesdirectory and install ASM using Helm.warningReplace the placeholders with your own values. For details, see the table below.
helm install -n axiomatics-asm asm -f asmcharts/values.yaml asmcharts --set imageRegistry=<your_image_registry> --set asmHostname=<your_asm_hostname> --set useExternalDatabase=true --set gateway.service.type=ClusterIP --set isAwsInstallation=true --set certificateArn=<certificate_ARN> --set serverSslKeyStorePassword=<keystore_password> --set enableMetricsDashboard=true --set influx.efsPvInfluxDataVolumeId=<influx_data_EFS_ID> --set influx.efsPvInfluxConfigVolumeId=<influx_config_EFS_ID>
tipStore this command in a TXT file for future reference, such as when upgrading to a later version of ASM or in case you want to enable cluster-level logging.
| Placeholder | Value |
|---|---|
<your_image_registry> | The image registry: For local registry: host.docker.internal:5000For remote registry: <aws_account_id>.dkr.ecr.<region_code>.amazonaws.com/axiomatics/ |
<your_asm_hostname> | The hostname of the instance running ASM. TIP: In case you don't have a hostname, use localhost. |
<certificate_ARN> | The Amazon Resource Name (ARN) specifying the server SSL certificate that you have configured on AWS ACM. This is going to be used by the load balancer. |
<keystore_password> | The password that will be used to decrypt the KeyStore. |
<influx_data_EFS_ID> | The Resource ID of the influx-data EFS.NOTE: Required only for deployments with Dashboard. |
<influx_config_EFS_ID> | The Resource ID of the influx-config EFS.NOTE: Required only for deployments with Dashboard. |
-
Upgrade the Helm charts replacing
<ALB_DNS_name>with the DNS name assigned to the ALB created in front of the ASM instance.warningThis step is required ONLY IF you installed ASM using Helm with
localhostas the value of theasmHostnameproperty.helm upgrade -n axiomatics-asm asm -f asmcharts/values.yaml asmcharts --set imageRegistry=<your_image_registry> --set asmHostname=<ALB_DNS_name> --set useExternalDatabase=true --set gateway.service.type=ClusterIP --set isAwsInstallation=true --set certificateArn=<certificate_arn> --set serverSslKeyStorePassword=<keystore_password> --set enableMetricsDashboard=true --set influx.efsPvInfluxDataVolumeId=<influx_data_EFS_ID> --set influx.efsPvInfluxConfigVolumeId=<influx_config_EFS_ID> -
List all pods and make sure they are all running.
kubectl get all -n axiomatics-asm
Troubleshooting
Extra commands that could assist your troubleshooting effort.
In the snippets below replace
<region_code>with your cluster's AWS Region<aws_account_id>with your AWS account ID
Kubernetes statuses
ErrImagePull
If the pod status is ErrImagePull because of an expired registry credentials secret:
- Delete secret.
kubectl delete secret regcred -n axiomatics-asm
- Recreate it.
kubectl create secret docker-registry regcred --docker-server=<aws_account_id>.dkr.ecr.<region_code>.amazonaws.com --docker-username=AWS --docker-password=$(aws ecr get-login-password) --namespace=axiomatics-asm
ImagePullBackOff
The status ImagePullBackOff means that the ECR Docker image is too large and cannot be downloaded. To resolve this issue, use the following commands to download the required image within minikube.
Replace the placeholders with the appropriate values before running the commands.
minikube ssh
su - root # Default password is 'root'
apt-get update
apt-get install unzip
curl "https://awscli.amazonaws.com/awscli-exe-linux-x86_64.zip" -o "awscliv2.zip"
unzip awscliv2.zip
sudo ./aws/install
aws configure # Provide AWS Access Key ID and AWS Secret Access Key
aws ecr get-login-password --region <region_code> | docker login --username AWS --password-stdin <aws_account_id>.dkr.ecr.<region_code>.amazonaws.com
docker pull <aws_account_id>.dkr.ecr.<region_code>.amazonaws.com/axiomatics/asm-core:<version>
What's next?
Add users
During the deployment, a Keycloak service was also installed, to serve as an authentication module for the users of ASM. Only a default administrative user is created automatically at this time. All other users must be created and assigned a role in Keycloak, before they can log in to ASM.
To add more users and map them to roles you must use Keycloak as described in Manage users in Keycloak. Then, you can assign them to projects following the instructions in the Users and projects topic.
For deployments with Policy Designer, you should also configure Keycloak accordingly.
Additional configuration
Once the installation of ASM has been verified as successful, there are additional configurations you may want to consider.